


 (1)")


Installing kitchen cabinets is a major project. However, with clear instructions, enough time, and standard tools, you really can do it yourself. Follow this step-by-step guide to getting started on the right track and admire a job well done when you’re finished.
This step-by-step cabinet installation guide will explain which tools to use, any extra supplies you’ll need, and how to prepare the space before installation can begin. Your cabinet installation will go more smoothly if you have a second person on hand to help you. As a DIY team, you can review each step of the job before you begin and set the stage for a successful installation.
Expert tip:
If you plan to paint the kitchen as part of your renovation project, consider doing that before installing your new kitchen cabinets. Painting walls and trim first will ensure that the cabinets don’t get splattered.
Use these standard tools and supplies for cabinet assembly and installation.
- Cabinet Layout
- Cordless Drill
- Tape Measure
- 5’ level
- Pry Bar
- Ladder
- Clamps
- Pin Nailer
- Extension Cord
- Drill Bits
- Table Saw
- Jig Saw
- Circular Saw
- Miter Box
- Stud Finder
- Framing Square
- Wood shims
- 2 x 4’s
- Finish Nails
- #10 x 2 ½ Pan Head Screws
- #8 x 2 ½ Trim Head Screws
- Pencil
- Hammer
- Screw Drivers
Inspect your new cabinets
When your cabinets arrive, open up the packing and inspect each piece to confirm you’ve received the correct sizes, color, and style that you ordered. For pre-assembled cabinets, be sure all of the parts are attached. Check each unit to look for any damage to the cabinet box, shelves, drawer fronts, and doors. If you ordered extra trim or filler strips, be sure they were included.
If you ordered ready-to-assemble (RTA) kitchen cabinets, inspect boxes, doors, and drawer fronts for any damage. Count all shelves, trim pieces, filler strips, hardware –brackets, drawer glides, and hinges – to ensure you have all parts. Before installation, you’ll first need to assemble your cabinets.
Assemble your RTA kitchen cabinets.
If you’re working with RTA cabinets for the first time, view our step-by-step assembly videos for specific guidance on cabinet assembly. Your first cabinet assembly may take 35-40 minutes. Each cabinet after that should take between 15-20 minutes to put together.
Walkthrough the cabinet layout.
This important pre-installation work will catch any problems before they arise – don’t skip it!
Locate any high spots on the floor.
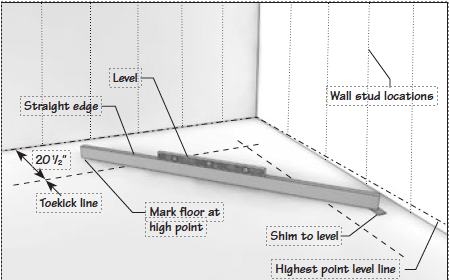
Over time a house settles, and the floor can develop a subtle slope. To ensure a level installation throughout the kitchen, you’ll need to identify the high spot on the floor and start your installation at that point. You can always place shims underneath a cabinet to make it level, which is much easier than cutting it down to level with the floor.
To find the high spot on the floor:
- Lay a straight 8-foot-long, 2-inch x 4-inch board on the floor against the wall, then place a carpenter’s level or laser level on top of it. The level will give you a plane of reference to work with as you go around the room.
- Shim the low end of the level until you get a level reading. Then mark the floor to indicate the high spot.
- Repeat the above process 24 inches from the wall and run the straight edge or level parallel to the wall where the front cabinet edge will end.
- Compare the high points on the front of the cabinets with the back, along the wall. You will use the higher point as your reference mark.
Follow this process carefully to ensure you end up with level and plumb cabinets and countertops.
Identify any vertical bumps in the wall.

- Place your level against the wall vertically. Watch for a plumb level or nothing sticking out from top to bottom.
- Work your way around the room, and as you go, mark the wall for a high spot or where the level is flat at the top compared to the bottom.
- Measure from the high point in the wall over to where both upper and lower cabinet runs will end –for example, next to the stove. You want to make sure upper and lower cabinets line up when installed.
- By measuring from the vertical high point, your cabinets will remain plumb and level along the wall.
Identify any horizontal bumps in the wall.
- Place your level against the wall horizontally. Watch for a plumb level or nothing sticking out from side to side.
- Work your way around the room, and as you go, mark the wall for any spots where the level rocks due to the bump. You’ll have to shim around that area to keep the cabinet plumb when you install it.
Identify the high spot on the ceiling.
This is especially important if your layout features cabinets all the way to the ceiling.
- Measure your cabinet height down from the ceiling to find any spots in the ceiling that are higher than others.
- Work your way around the room, and as you go, mark where the ceiling has a high spot
Follow these layout steps so all of the cabinet lines will be level and square when you are done.
Place a mark on the wall where the top of the base cabinets will stop.

- Beginning from the high point of the floor, measure the height of the back of your base cabinets and mark the wall.
- Continue a level mark to extend a horizontal line everywhere around the room where the base cabinets will go.
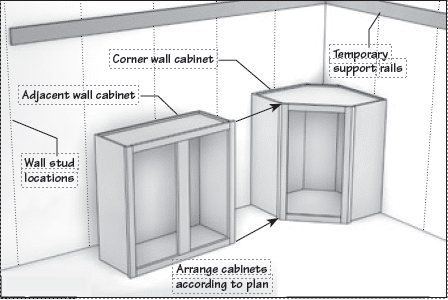
- Before installing base cabinets, arrange and dry-fit the base cabinet boxes, starting with the corner unit. Place the remaining cabinets flush against each other according to your kitchen layout and design.
- Measure and place a mark and label on the wall for the location of each cabinet box. You will not be securing any of the base cabinets yet.
- When making outlines and measurements on the wall, keep in mind that the cabinet face frames on the front of the cabinet extend past the cabinet box on either side. The cabinet face frames will meet, creating a space at the back of the cabinets. Maintain that space as you mark locations on the wall. You may need to place a shim if the cabinet is not flush with the wall.
- Check the measurements for the dishwasher, sink, and stove openings, and be sure the cabinet doors, if pre-installed, open in the proper direction.
Now the age-old question which comes 1st the base or the walls? Some installers swear by installing the walls 1st so the base cabinets are not in your way, while others prefer to have base cabinets in 1st and then walls.
There is not right or wrong here and it is all personal preference and what you are most comfortable with. To begin installation, screw a support strip using a furring strip on the line you added to your wall for base and wall cabinets.This will help support the cabinets and aide in keeping cabinets level.
Installing the upper wall cabinets first.
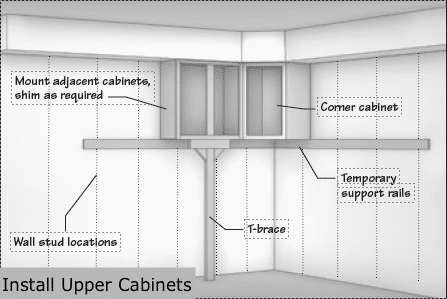
- Measure down from the high point in the ceiling to measure for the height of the back of your upper wall cabinets.
- Measure and mark points to the right and left of your original mark and draw a level, horizontal line connecting each mark.
- Do this around the entire room where upper cabinets will hang.
- Mark and label the position of each upper cabinet along the wall.
- Double-check your layout and cabinet level.
- Layout the upper wall cabinets around the room and plan to install them first. This will keep the base cabinets out of your way while you’re installing the upper cabinets.
Locate the wall studs.
Locate the wall studs with a stud finder. You’ll screw the cabinets into the studs for a secure installation.
- Place a pencil mark on the wall near the center of each stud.
- Fully extend the lines up and down the wall with a carpenter’s level. Keep the lines pump.
- Mark the back of the cabinet where it will meet the stud. On those marks, drill a small pilot hole at the top and bottom of each cabinet. Pilot holes will make it easier to attach the cabinet to the stud.
You can use painter’s tape to mark the wall studs if you’ve painted the walls and don’t want to mark them up with a pencil. Mark your centerline on the tape instead of the wall.
Set your ledger on the wall.
- Secure a ledger or thin piece of wood to each stud where a cabinet will sit while you secure it to the studs.
Select suitable installation hardware.
Wall stud installation (preferred method):
- Use 3-inch #10 screws to mount the cabinet to the wall studs. Some manufacturers offer special washer-head screws made specifically for this purpose. These screws are the best option as they have a washer built into the head.
Installing in drywall:
- If you cannot attach the cabinet to a wall stud, use toggle bolts to attach to drywall. Toggle bolts require pre-drilled holes. You must also secure these drywall-attached cabinets to an adjacent cabinet.
Begin corner cabinet installation
Always start in a corner where two runs of assembled kitchen cabinets will come together.
- Remove cabinet doors and set them aside.
- Transfer the stud locations to the cabinet by drawing a line on the back with a pencil and starting a screw into the cabinet’s installation rail(s).
- Position the corner cabinet on the wall stud marking and set it on the ledger for extra support.
- Use a level to be sure that the cabinet is straight. If necessary., insert a shim to make it level and flush with the wall.
- Use the appropriate hardware for your wall type to mount the cabinet to the wall.
- After installing the corner cabinets, work outward at either side to install the remaining cabinets.
Attach cabinets together.
- Once the first cabinet is secure, use C-clamps to attach the next cabinet to the first one you installed.
- Adjust the clamps and re-clamp the second cabinet until it is flush and level with the first one. Insert wood shims if necessary.
- Once level and flush use your clamp to hold cabinets in place. Drill through side of faceframe a pilot hole, using a 3/32 drill bit. Each wall cabinet should have 3 holes. (top, middle, and bottom of cabinet)Use a 2 1/2-inch, #8 screw to attach the second cabinet to the first cabinet.
- Countersink the screw for an even appearance.
Always attach cabinets together at the face frame, never through the side panels.
Install remaining cabinets.
Expert tip:
Do not tighten any mounting screws until you’ve attached all of the cabinets together in sequence.
- At the stud locations on the cabinet’s back panel, drill a 3/16-inch pilot hole through the panel and into the stud.
- Once pilot holes are drilled, screw cabinets together using #8 x 2 ½” trim head screw. Wall cabinet should be secure to adjacent cabinet.
- Mount the cabinet to the wall stud with a 3-inch, #10 screw. Insert a shim if needed to level.
- When you’ve attached all cabinets, seat all of the mounting screws, tighten the mounting screws against the back of the cabinet, but take care not to drive the screw head into the cabinet’s surface.
- Always check that all cabinets remain level after tightening.
Adjust drawers.
After you’ve hung all of your cabinets and replaced the doors, your kitchen cabinet installation is almost complete. However, you may still need to adjust the drawer fronts, so they are all level.
- To adjust the drawer fronts, loosen the screws holding the drawer glides to the frame of the cabinet. Adjust the drawer vertically to align and then tighten the screws.
- Drill a 1/8-inch pilot hole through the second hole below the drawer glide. Drive a 5/8-inch, #8 screw to secure the drawer.
- Look at the cabinet drawers and doors from the front to check alignment.
Drill holes in the cabinets doors for your handles and pulls.
- Measure twice before you drill to ensure all handles on all doors line up.
- Drill a 1/8-inch pilot hole and drive a 5/8-inch, #8 screw to secure the handles or pulls.
Repeat the process for base cabinets
Begin corner cabinet installation.
- Remove cabinet doors and set them aside.
- Transfer the stud locations to the cabinet by drawing a line on the back with a pencil and starting a screw into the cabinet’s installation rail(s).
- Position the corner cabinet on the wall stud marking and set it on the ledger for extra support.
- Use a level to be sure that the cabinet is straight. If necessary., insert a shim to make it level and flush with the wall.
- Use the appropriate hardware for your wall type to mount the cabinet to the wall.
- After installing the corner cabinets, work outward at either side to install the remaining cabinets.
Attach base cabinets together.
- Once the first base cabinet is secure, use C-clamps to attach the next cabinet to the first one you installed.
- Adjust the clamps and re-clamp the second cabinet until it is flush and level with the first one. Insert wood shims if necessary.
- Once level and flush use your clamp to hold cabinets in place. Drill through side of faceframe a pilot hole, using a 3/32 drill bit. Each base cabinet should have 3 holes. (top, middle, and bottom of cabinet)Use a 2 1/2-inch, #8 screw to attach the second cabinet to the first cabinet.
- Countersink the screw for an even appearance.
Always attach cabinets together at the face frame, never through the side panels.
Install remaining base cabinets.

Expert tip:
Do not tighten any mounting screws until you’ve attached all of the cabinets together in sequence.
- At the stud locations on the cabinet’s back panel, drill a 3/16-inch pilot hole through the panel and into the stud.
- Mount the cabinet to the wall stud with a 3-inch, #10 screw. Insert a shim if needed to level.
- When you’ve attached all cabinets, seat all of the mounting screws, tighten the mounting screws against the back of the cabinet, but take care not to drive the screw head into the cabinet’s surface.
- Always check that all cabinets remain level after tightening.
Adjust base cabinet drawers.
After you’ve installed all of your base cabinets and replaced the doorsyou may still need to adjust the drawer fronts, so they are all level.
- To adjust the drawer fronts, loosen the screws holding the drawer glides to the frame of the cabinet. Adjust the drawer vertically to align and then tighten the screws.
- Drill a 1/8-inch pilot hole through the second hole below the drawer glide. Drive a 5/8-inch, #8 screw to secure the drawer.
- Look at the cabinet drawers and doors from the front to check alignment.
Drill holes in the cabinets doors for your handles and pulls.
- Measure twice before you drill to ensure all handles on all doors line up.
- Drill a 1/8-inch pilot hole and drive a 5/8-inch, #8 screw to secure the handles or pulls.
Now that base and wall cabinets are installed, you can install finishing molding, crown, scribe, and toekick.
These instructions are based on standard kitchen cabinet installation methods. Before you start, be sure to read the manufacturer’s directions for any cabinet installation project and use their recommended installation method for that product. The directions may include hardware or methods in addition to what is outlined here.
Frequently asked questions about cabinet installation and assembly.
Where do you start when installing cabinets?
Install the upper wall cabinets first. Then the base cabinets won’t be in your way while you’re installing the upper cabinets. Start with the upper corner cabinet.
Are cabinets hard to install?
Cabinet installation falls into the “advanced” category of DIY projects. To ensure a successful installation, take extra care to get all measurements correct before starting to drill into cabinets. These steps can be time-consuming and even frustrating; many homeowners hire a professional to make sure the installation is done correctly.
What is the average cost of cabinet installation?
The labor cost (including preparation and cleanup)typically runs between $80 and $190 per cabinet to install kitchen cabinets.
Find the perfect cabinets for your kitchen remodeling project.
Now that you know what’s involved to assemble and install kitchen cabinets, you can see your way clear to a complete kitchen remodel. If you would like a professional installer to help you with your project, Cabinet Corp has a preferred list of licensed, bonded, and insured installers available for hire. To begin designing your next project, visit with our expert cabinet designers today to find the perfect style and type of cabinet for your dream kitchen.
You can download the installation guide PDF, for step-by-step direction as you work. And check out the assembly videos to build your beautiful cabinets to last.